Tuesday, September 25, 2018

Snowy dies for Snowy Days! Lots of fun and Giveaways!


Good Morning!!!
We're Celebrating the IO Winter Die release again today and I have a couple more holiday pojects for you.

This one uses:


I LOVE this one. So quick and easy! All I did was cut out the  Die:

and glued it over some fun paper I made with my Gel Press. 
I added a few "Diamonds" and that was that!!! A fun Wintery note card

Be sure to leave a comment because I'm going to pick a winner from today's and yesterday's post for a $10.00 gift certificate. 

Head on over the IO Blog for a list of today's players

XX's and Oh's

--Vicki~~

Monday, September 24, 2018

Impression Obsession Fall Winter Die Release Celebration


Good Morning!!!! 

I'm excited to share a project with a few of the dies from the IO Fall Winter Release.
There are a lot of wonderful new dies and they are all available now on the IO Website

For my project, I combined old and new dies.

The New:

I stamped the pinecones with IO Ink in the following colours


The Tried but true!!


If you like what you see, leave a comment! I will be drawing one name from all the comments today and tomorrow to win a $10.00 GIFT CERTIFICATE 

THE CONTEST IS OPEN UNTIL SEPTEMBER 29TH AT NOON

Check out the IO Blog for a list of players!!

XX's and Oh's

--Vicki~~


Thursday, September 20, 2018

IO Thursday Designer Challenge -Things with Wings!


Hello!!! Today's challenge is to create a project that has wings!! 

Well this sweet little Angel from Santo's Navidad, a new stamp set from Peggy Jo Ackley!

You can find the matching dies here 

I coloured the image and peace banner with copic markers and added a touch of sand coloured glitter.

I paired the image with the delicious paper from Simple Stories  Vintage Christmas

Have you started your Christmas Cards yet?

Head on over to the IO Blog to enter your creations!
A winner will be chosen for a lovely gift certificate!

ALSO stay tuned for a new die release the beginning of next week!

XX's and Oh's

--Vicki--

Thursday, September 6, 2018

IO stamps Thursday Designer Challenge- Colours of the Rainbow


Good Morning!!!! Hope you're enjoying these first days of Autumn!

This weeks challenge is all colours of the Rainbow. Today I have two quick cards to share. I'll get the links to the inks a little later today, but i'm on the fly this morning. 
This first one displays fall in all its splendor! I love how Mother Nature Paints a Beautiful Rainbow of Colour across the landscape in Autumn, my favourite time of year!!!


I created the leaves by stamping first in golden rod ink, then orange, cherry red and a touch of tan.
Good grief, I love my Misti!


This card uses your typical bright and cheery rainbow colours and was easy peasy to make!!!

The stamps I used here are

and
one of the stamps from Seth Apters Grunge Grid set

Here's who's hopping today!

Be sure to leave your creation on the IO blog for a chance to win some stamping bucks!!!

Saturday, September 1, 2018

Technique Junkies Stamps September Release Blog Hop


Good Morning!!!

Welcome to the Technique Junkies Stamps September release Blog hop.
If you've been hopping already, you have arrived from my sweet friend Ceal's Blog 

I have a couple of spooky creations to share with you today! So exciting because I LOVE LOVE LOVE Halloween cards!!!

For this card I combined three stamps

Old Wall, which I stamped in IO Tan Ink. 

I then took a Burnt Sienna Copic and dabbed some onto my colourless blender in order to deepen the shadows a bit.

I stamped the Ephemeral Crow onto some Blue Designer Paper and cut it out from the background
Lastly, I took the Trick or Treat Banner and stamped that onto mustard Designer Paper. I added some Copic Marker in the shadows to create more dimension

The Designer Paper is an older one from Graphic 45. Oldies but Goodies!!!!!


I seem to be all about the ATC Coins these days!!!! They are so fun to create!!!

I used BOO Convention as my main image for the coin after painting the chipboard in black and adding green stripes!

I shaded the Ghoulish Gaggle of Ghosties with Copic Marker and then added some
Nuvo Glow Drops in Apple Sour (Mmmm sounds like a Martini in the making!)

Here is what it looks like in the dark!


Don't forget to Check out all the September Release Hop Stamps which you can purchase at a discount for the next several days!

If there's something else you just HAVE to HAVE! please feel free to use my discount code on any of the products, except those listed below!


Now hop on over to my super duper pal Jeanne's Blog to see her neat creations!

Have an amazing day!

XX's and Oh's
--Vicki~~

Friday, August 17, 2018

Emerald Creek and Stencil Girl Blog Hop


Good Morning!

Welcome to the Emerald Creek and Stencil Girl Blog Hop!
I feel incredibly blessed to have been asked to participate in this hop with such a group of intensely talented artists!


If you have been hopping already, you've probably arrived from Katelyn's Blog


IF not, today's hop starts at Debi Adams Blog


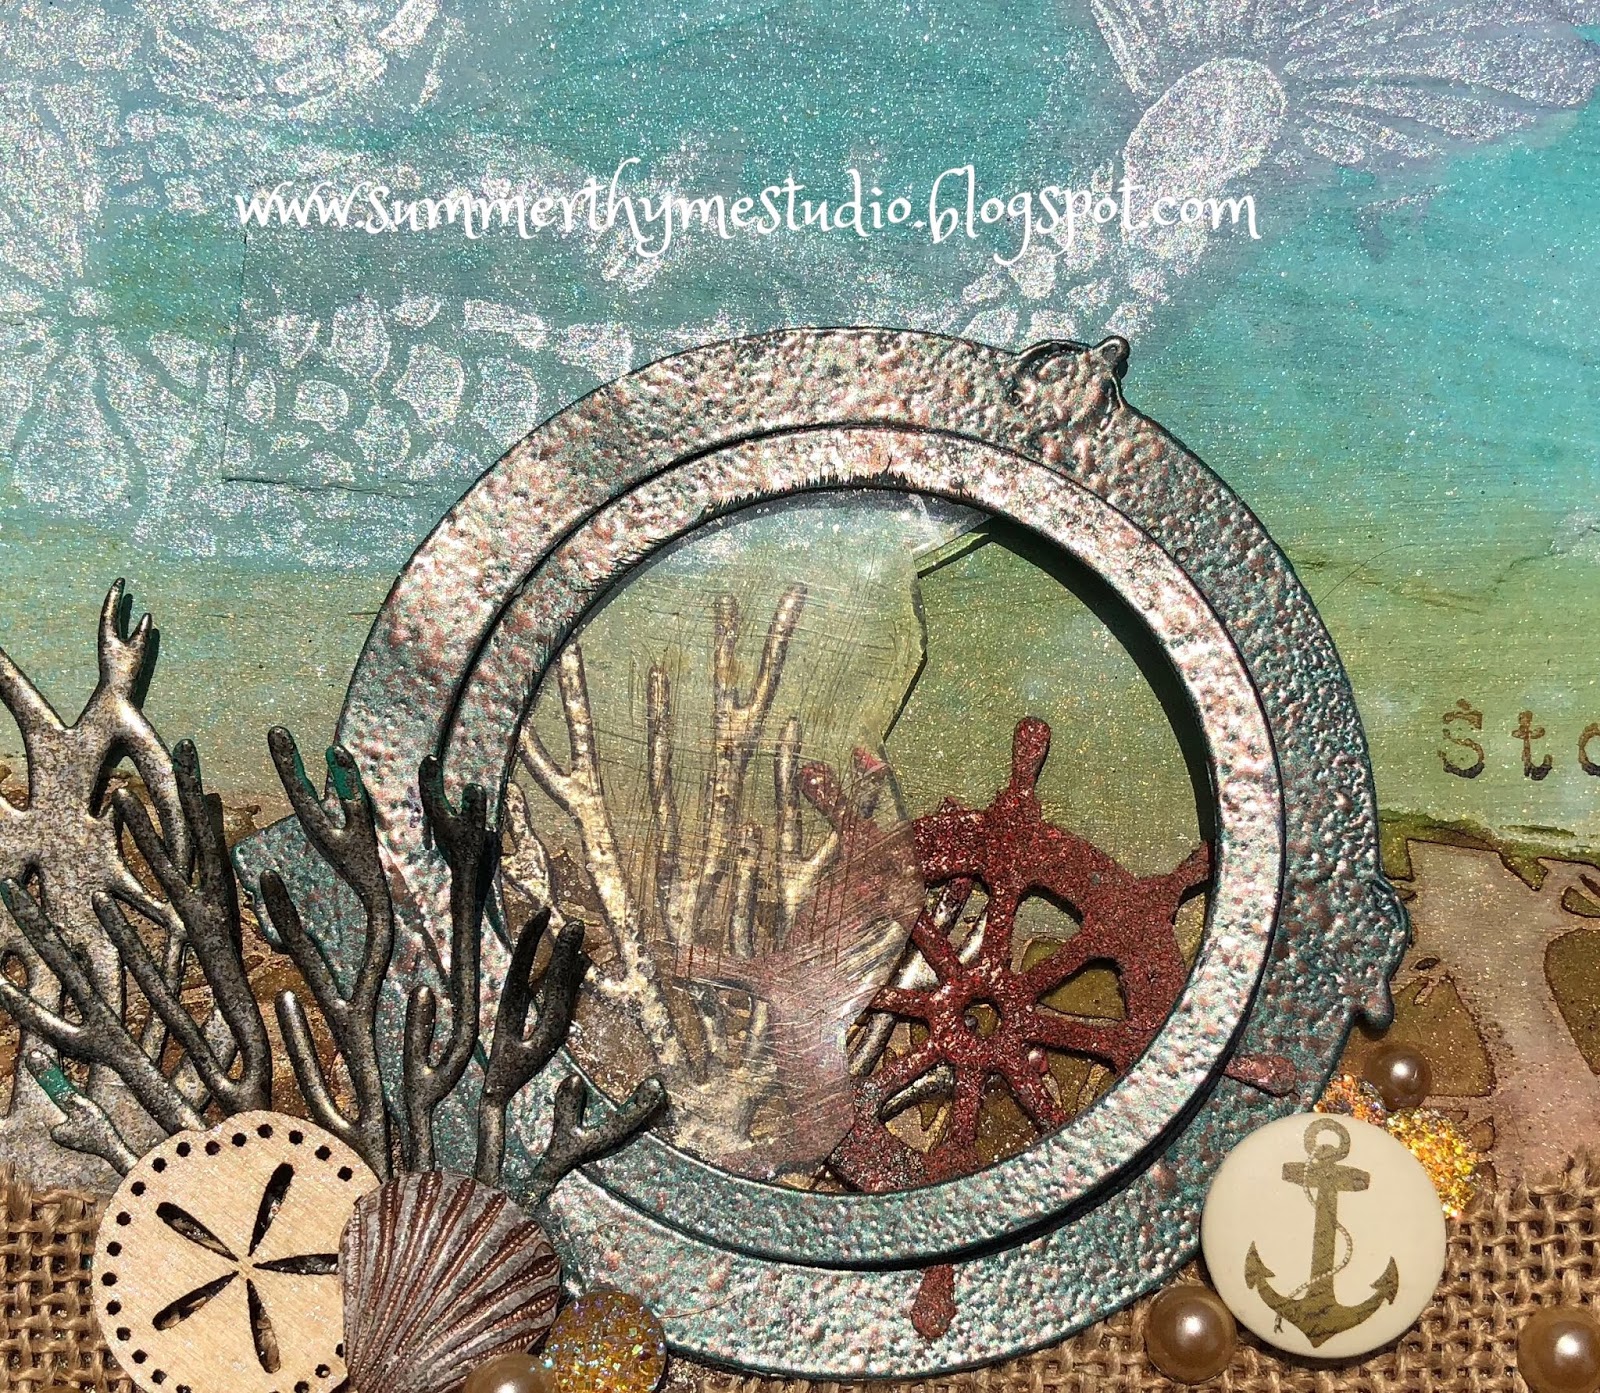
For my piece today, I combined several stencil girl stencils, along with Emerald Creek's Baked Textures and embossing powders  to create this fun Journal Cover.

I started with a 8x8 piece of corrugated cardboard and collaged some scrap designer papers on with gel medium, sealing it all in with a coat of white gesso. 
I then sprayed the background using Technique Junkies Shimmering Bliss in Ocean Depth  Dolphin Cove , Lucious Lawn and Harvest Sunset

Next, Using some texture paste and the Bare branch Thicket and Mermaid Stencils and Masks I added more texture. I added some more Dolphin Cove Spray to the upper bordre and some Worn Saddle  over the sandy area. To add even more dimension, I sprinkled Dirty Sand Baked Texture over that area.

Next I took the Mermaid from the Mermaid Stencils and Masks and Sprayed over with Mixed Metal Shimmering Bliss. Sooooo pretty!!!!!!!

After all that was done, I started to embellish with Die Cuts, adding even more dimension to them with Patina Oxide on the ships window, Ancient Amber  on the Sea Salad! and Chunky Rust on the ships wheel.  I had this great idea to make the Broken window, but wasn't sure if it would work. You should have heard the squeals of delight here when it did.


Sooooooo, how did I do it? I cut a small circle in Acetate (yep, that's why I was almost certain it wouldn't work. I figured I'd melt it down or set the house on fire! But it did!!!!  So, as I was saying, I cut the circle from acetate and then cut it in half leaving a jagged edge. I took a smidgen of tape runner and taped the acetate down to a piece of cardstock. I inked up the acetate piece with versamark and sprinkled Vanilla  Sugar Embossing Powder on it . Oh my gosh. It smelled good enough to eat!!!!

I just took my time and heated it from underneath. It eventually all melted without melting the acetate! SCORE!!!!!!!! After it dried I took a piece of sanding blog and roughed it up a bit!!!!


Lastly, but not Leastly {GRIN} I added the sentiment, which is from one of Seth Apters Collections available at Impression Obsession Stamps. It's called Journal Jargon 4

Thanks for stopping by and having a peek at this piece I designed for you!!!!

I LOVED working with the wonderful Emerald Creek and Stencil Girl Products!!!

Here's more details on the Blog Hop Giveaway:


 GIVEAWAY
One lucky winner will receive $50 in Gift Certificates to Emerald Creek
and 
StencilGirl® Products!
Enter to win by leaving a comment below.
Then be sure to visit the other blogs in the hop and comment to win.
The more blogs you comment on, the more chances you have to WIN!
One winner will be chosen at random from all blog comments!
(One comment per blog please.)
XX's and Oh's

--Vicki~~

Thursday, August 9, 2018

Impression Obsession Stamps Thursday Challenge-It's a guy thing


Good Morning!!!!

I'm excited to share my card with you today because It's a card I created for Jon's birthday.
Yep, Jonathon turned 22 on the 7th of August. Where did the time go?

It's fitting this week's challenge is to make a manly card 

I used the Pocket Watch as my main focal point
I cut the die out onto some green cardstock and then embossed it twice with Seth Apters Baked Texture in Ancient Amber. I cut a smaller circle for the middle and stamped the Happy Birthday sentiment from the Timeless Classic stamp set. I let that dry a touch and then embossed it three times with Baked Texture in Vintage Beeswax. I used a week bit of the Ancient Amber on the wooden "love" cutout as well. 


For the background, I inked up a white cardback with Tim Holtz Oxide inks and then  used Seth Apter's Inside Out Stencil  to add some dimension. Then I embossed the panel with the 3-D Foundry embossing folder I distressed the edges with Vintage Photo Distress Ink.
I added some little bits and bobs for interest and then sprinkled and heated up little puddles of Ancient Amber here and there!!!  The negative is an actual photograph of Jon, when he was a baby :)


I dare say the Birthday Boy Liked it!

Be sure to link up your Masculine Creations on the Impression Obsession Blog

Here's who's playing today~~~


XX's and Oh's

--Vicki~~